
The four most common yoga injuries, and how to avoid them
Yoga is sold as the thing that heals your body, and for most people it does exactly that. But I spent years in physiotherapy practice treating yogis who were injured by their own practice, and after enough of them a pattern became impossible to ignore. The injuries were not random. They clustered around four places, and almost every one came from the same underlying mistake.
The mistake is treating an anatomical structural limit as a flexibility problem.
Some limits in your body are muscular, and those you can work with patiently over months and years. Others are set by the shape and length of your bones, and no amount of stretching will ever change them. When you ask for a shape your skeleton will not give you, your body does not simply refuse. It finds a way round. And the way round always runs through a joint that was not built to take it. That is where the injury happens.
What makes it harder is that some of the most commonly taught cues in yoga classes push you straight towards those compensations. Not out of carelessness. Out of a focus on how the pose looks from the outside rather than what is happening inside it.
Here are the four, what actually goes wrong in each, how to test yourself at home, and what to do instead.
Where I am coming from
I qualified as a physiotherapist in Australia in 2004, so I have spent more than twenty years studying the human body and how to keep it working. I started practising yoga in 2006 and completed my 500 hours in 2010. In 2011 I began teaching anatomy on yoga teacher trainings, and I have now taught on more than seventy of them. I created Samasti in 2016 in order to try prevent the injuries that I treated in my teachers and peers. Alongside that I run mindfulness courses for people living with chronic pain, anxiety, depression and stress, and I teach continuing education to other physiotherapists on the place where yoga and pain meet.
I mention all this only because the four things below cut against some standard yoga teaching, and you should know where the disagreement is coming from.
1. Arm balances, and why your wrists hurt in downward dog
Wrist pain in weight bearing poses usually starts in the forearm, not the wrist. Turning the palm flat stops at a bony limit most people cannot reach, so the difference is made up by the wrist or the shoulder on every load. The fix is to set the shoulders first and let the hands land where they land.
Start with the most common complaint in any class. Wrists that ache in downward facing dog, in plank, in anything that puts weight through a flat hand.
Almost nobody looks at the forearm, and the forearm is where the answer is. Turning your palm to face down is a movement called pronation, and it does not happen at the wrist. It happens between the two bones of your forearm, the radius and the ulna, as one crosses over the other. It has a hard limit, and that limit is bone meeting bone. It is not a stretch. You cannot open it up.
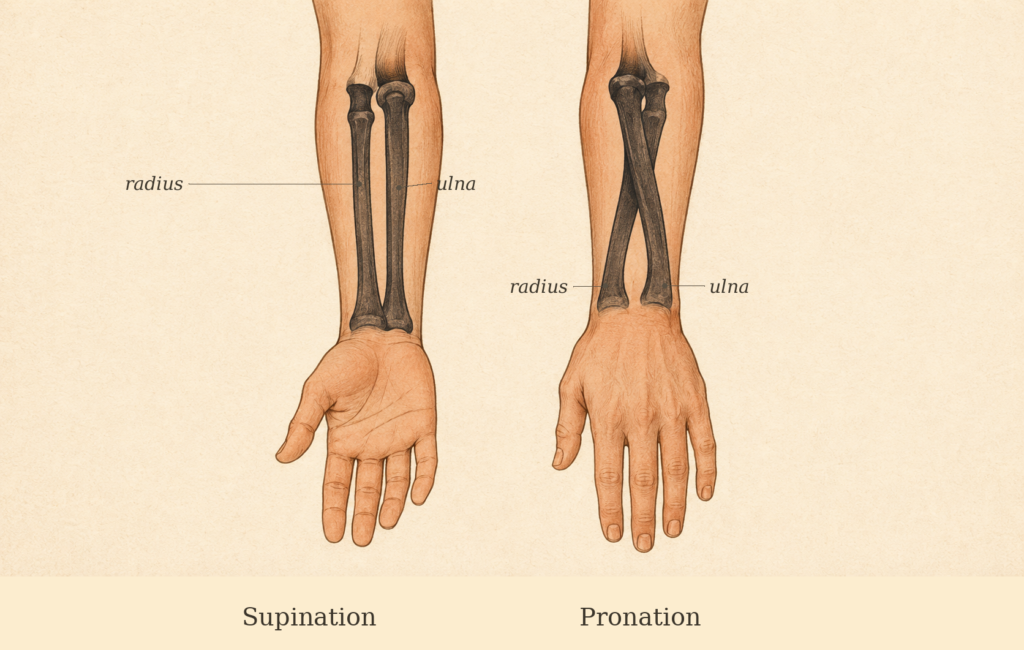
Try this. Stick your thumb out, tuck your elbow in against your side, and turn your palm downwards as far as it will go without letting the elbow drift away from your ribs. Look at the angle. Most people stop noticeably short of flat.
Now think about what happens when you put that hand on a mat and press down. You have exactly two ways to make up the difference. You can bend at the wrist, which loads the wrist joint every time you take weight. That is the wrist pain. Or you can rotate the shoulder inwards, which gets the hand flat but puts the shoulder in the one position you least want it in while bearing weight.
And here is where the teaching makes it worse. The usual cue is to set the hands first. Point your index finger to the top of the mat, line your fingers up with the long edge, and so on. You obediently place your hands, and then your shoulders absorb whatever is left over. Then a moment later the same teacher tells you to rotate your shoulders outwards, which lifts the edge of your hand off the floor, and you quietly undo it to keep the hand down.
Do it in the other order. Set the shoulders where you actually want them, in external rotation, and then let the hands land wherever they naturally land. For many people the fingers will turn out somewhat, and the pose will look less tidy than the person next to you.
Tidy is an aesthetic. Your shoulders, elbows and wrists have to last you the rest of your life. Where your fingers point relative to the edge of a mat matters far less than whether your joints are stacked in a position they can tolerate under load.
2. Headstand, and the twenty percent who should not be doing it
Roughly one in five people cannot do a traditional headstand safely, because their arms are shorter than their head and neck, and bone length does not train. The safe versions for those proportions are folded blankets under the forearms, a supported inversion, or tripod.
Headstand gets called the king of the asanas, and it is not available to everybody. That has nothing to do with strength or flexibility. It is about the length of your bones.
Roughly one in five students who come through my trainings cannot do a traditional headstand safely, and there is nothing they can practise that will change it.
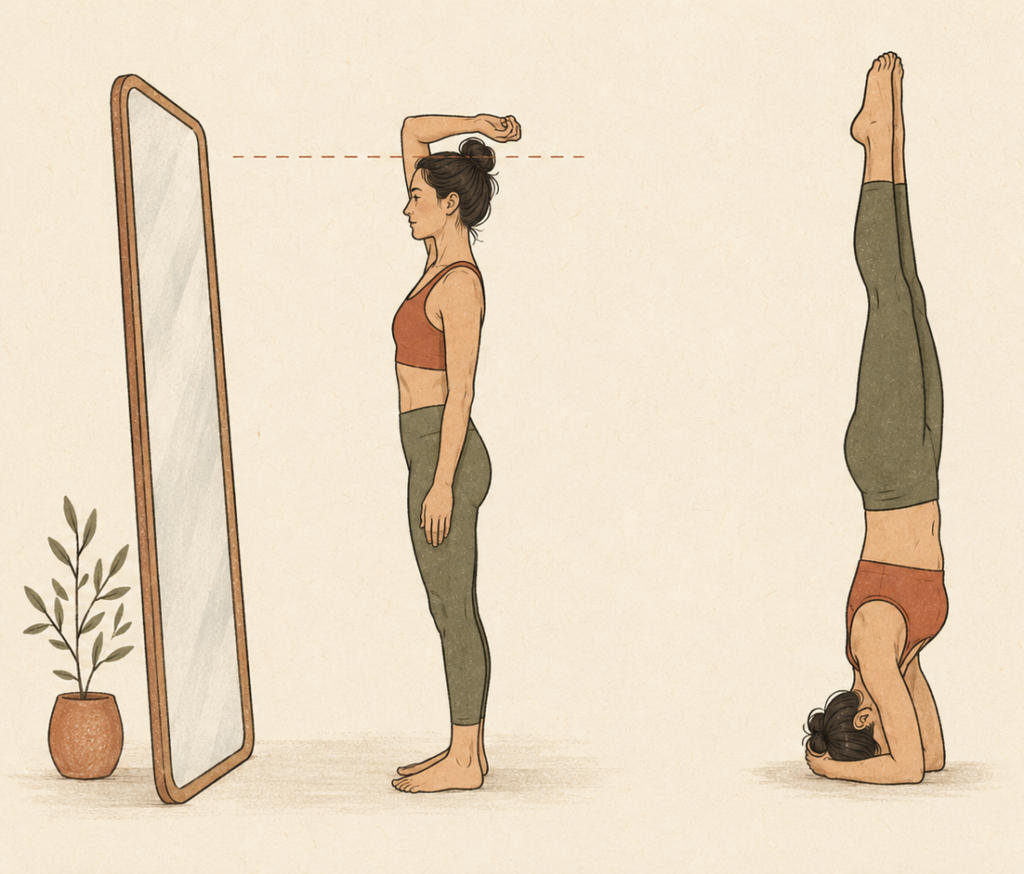
Here is the test. Stand in front of a mirror. Reach one arm straight up, then bend it at the elbow. Without letting your shoulder hitch up towards your ear, compare the height of your elbow with the height of the top of your head.
If your upper arm is shorter than the height of your head and neck, the triangle of head and forearms cannot sit level on the floor. Something has to give, and there are only two candidates. Either you shrug your shoulder blades up towards your ears, which is precisely what your teacher is trying to correct when they tell you to draw your shoulders away from your ears. Or you shorten your neck by compressing it, which is the more common choice and the more expensive one.
Your neck is not built for that. The vertebrae in your cervical spine are much smaller than the ones in your lower back, and they are designed to carry the weight of a head. A neck held in neutral can take a surprising amount of load. A neck that is compressing to make up a shortfall in arm length cannot, and doing it repeatedly over years is how people arrived in my clinic.
There are good ways round it. Put folded blankets under your forearms, which effectively lengthens your arms and lets the head and forearms sit level. Take the weight off your head entirely with a supported inversion, in a FlyHigh style setup for instance, and you keep every benefit of being upside down without loading the neck at all. Or, if your neck already has real strength, work with tripod pose instead.
None of these are lesser versions. They are the correct version for your proportions.
3. Lotus, the most dangerous pose in the room
Lotus needs about 115 degrees of external rotation at each hip. A hip that cannot give it borrows the movement from the ankle ligaments or the knee meniscus, which is how lotus puts yogis in surgery. Test both hips in a chair before the pose, not during it.
I want to be blunt about this one, because it does not look dangerous. Padmasana looks like sitting.
I know yogis who have needed surgery because of this pose, and others who cannot sit comfortably any more. The reason it catches people is that you do not find out whether your body can do it until you are already committed. The damage happens in the moment you lift the second leg into place.
What the pose actually requires is around 115 degrees of external rotation at the hip. Both hips.
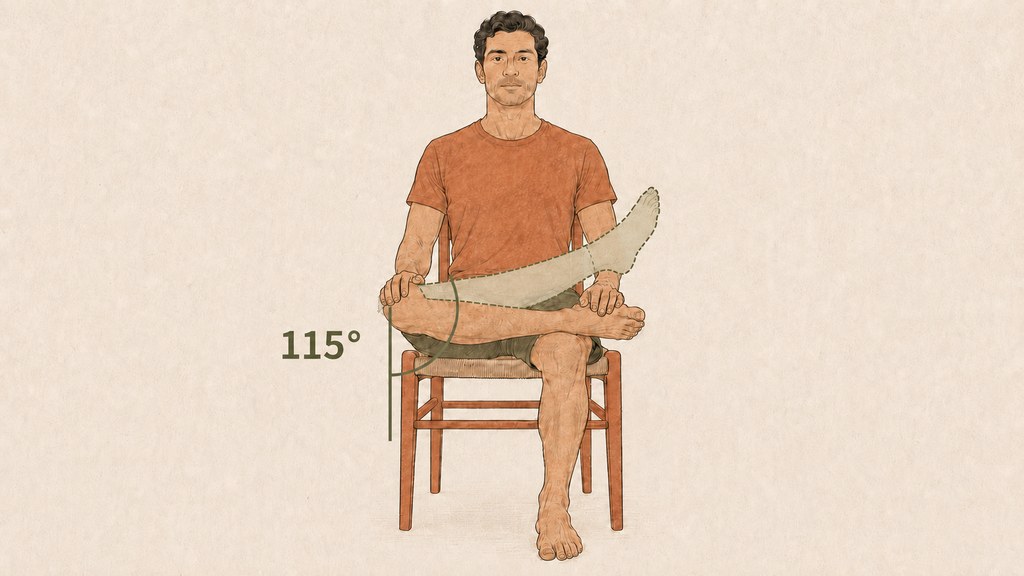
You can check yourself in a chair. Sit facing a mirror, cross one ankle over the opposite thigh, keep the crossed knee pressing down and in line with your hip rather than letting it lift, and then raise the foot. How far the foot comes up tells you how much external rotation you have. Ninety degrees is a common finding and it is not enough. You want about 115. Check both legs, because almost everyone has more on one side than the other, usually the side they habitually cross when sitting.
If you do not have it, your body will find the rotation somewhere else. There are two places it looks, and both cost you.
The first is your ankle. You roll the foot over and borrow the movement from the ankle joint, which loads the connective tissue and ligaments on the outside of it. If you come out of lotus and your ankles feel sore or uncomfortable, that is what has been happening. Keep doing it for years and you create genuine instability in an ankle you rely on for everything else.
The second is your knee, and this is the one that ends in surgery. If the hip will not rotate, then as you lift the second leg the force goes through the knee, and that is where the meniscus tears. It usually announces itself as a sharp pain, and sometimes not until afterwards.
The two rules that matter
You should never feel pain in a joint.
Not in the knee, not in the hip, not in the ankle, not in the wrist. Muscular sensation while stretching is normal and useful. Joint pain is information that you are borrowing from somewhere you should not be.
Health before flexibility, every time.
The other thing worth saying plainly is that lotus is not a hip opener. It is a pose you earn once your hips are already open. If you want to work towards it, the work is elsewhere: rock the baby, pigeon, a simple glute stretch, or just sitting cross legged and leaning forward until you feel the hip. And it is worth asking yourself honestly why you want the pose. If the answer is that it looks like the real thing, that is not a good enough reason to risk a meniscus.
4. Trikonasana and the side bends, where your lower back pays
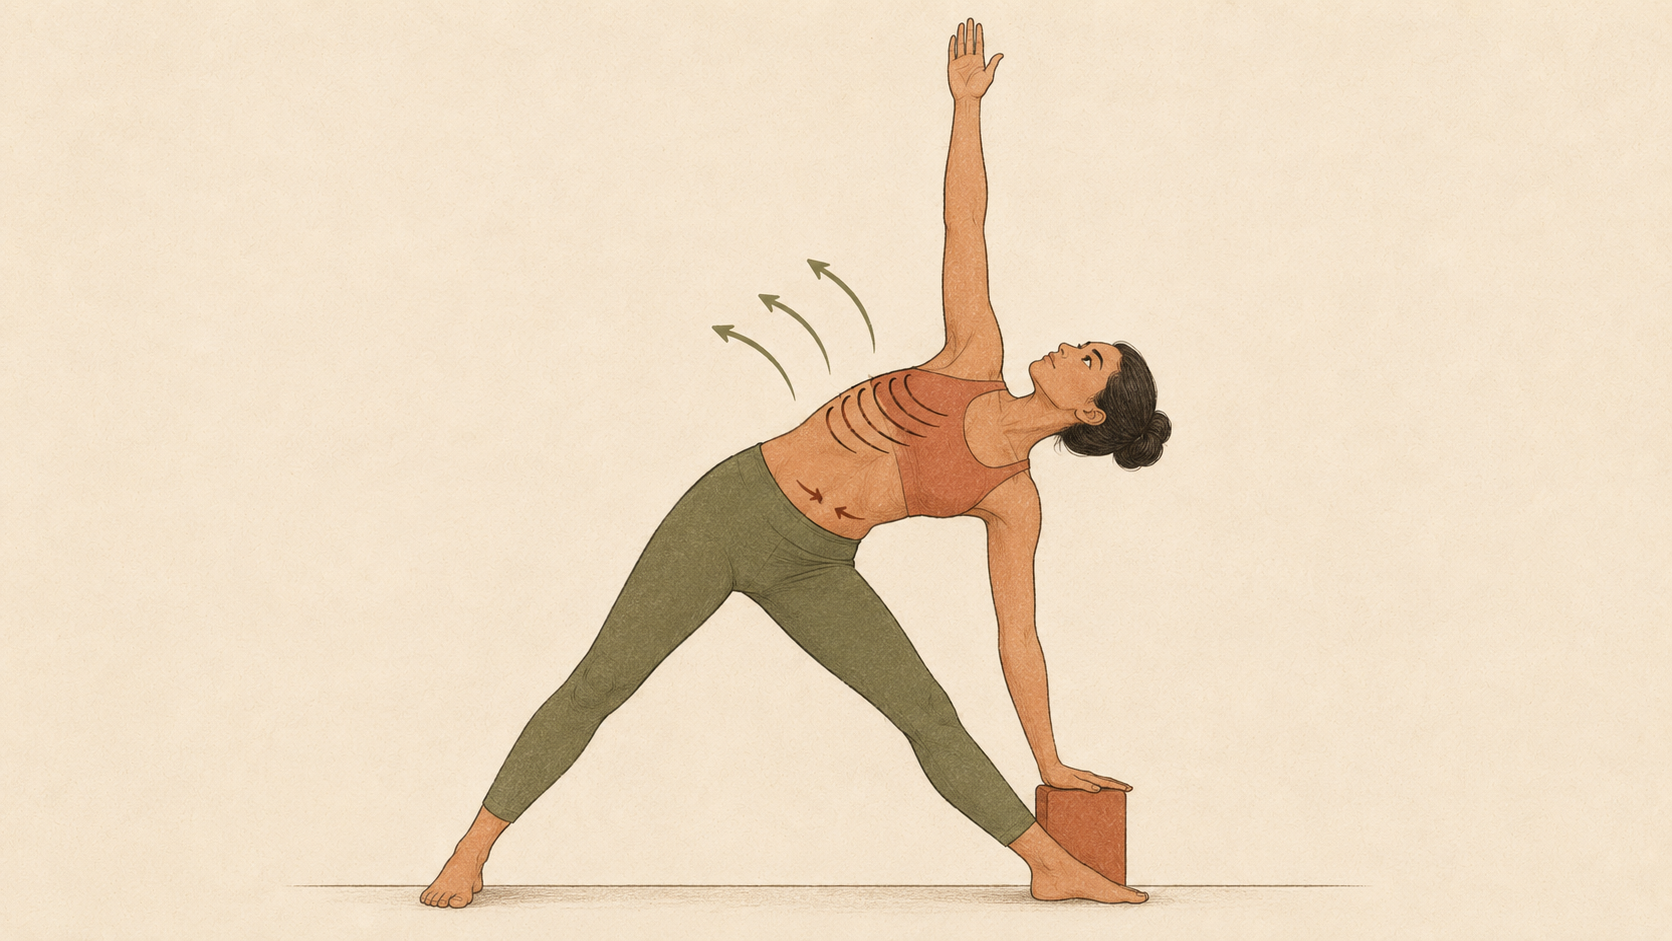
Side bends hurt the sacroiliac joint, where the spine meets the pelvis, and stretched ligaments there do not recover the way muscle does. Two changes protect it: breathe into the ribs rather than the belly during asana, and press the outer edge of the back heel into the floor.
The last one is the whole family of side bending poses, and triangle is the clearest example.
The joint that gets hurt here is the sacroiliac joint, where your spine meets your pelvis. The pain shows up as something quite specific and low in the back, and sometimes at the front of the hip instead, which is why it often gets misread. That joint is held together by ligaments, and if you stretch ligaments you get acute pain. Ligaments also do not recover the way muscle does.
There are two things that protect it, and one of them is going to sound wrong if you have been practising for a while.
Breathe into your ribs, not your belly. Yoga teaches the belly breath, and the full yogic breath, as though they were simply the correct way to breathe. They are excellent, in the right place. The belly breath is right for meditation, for winding down, for shavasana. The full yogic breath is right for pranayama, where the point is to move as much air as possible. But during asana, what you want is the thoracic or lateral breath. As you inhale, the rib cage widens outwards and the belly stays quiet. You are not sucking in and you are not bracing. This is still diaphragmatic breathing. What it does is switch on the muscular system that stabilises your spine, and a belly breath switches it off.
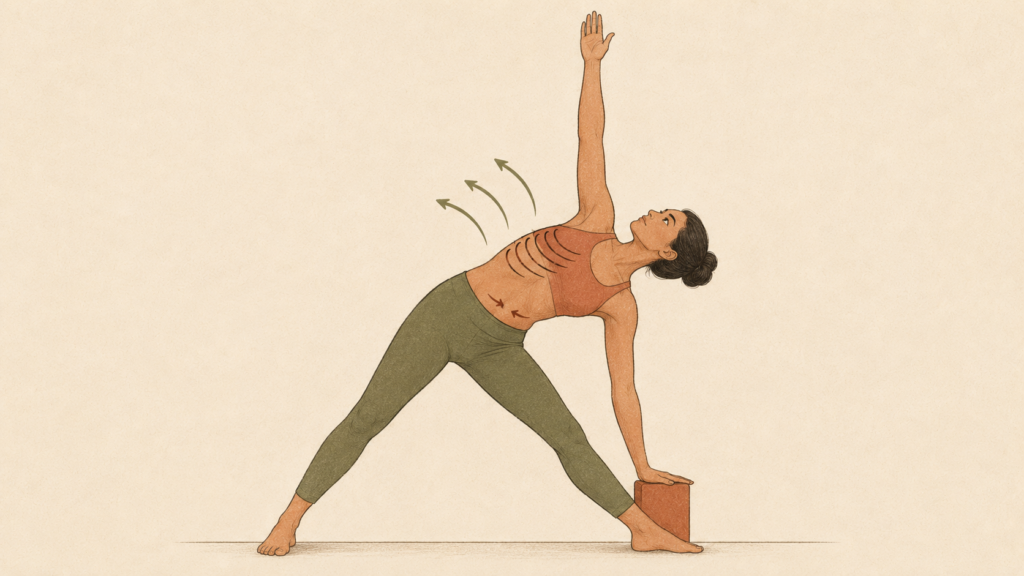
You can feel the difference in about a minute, and I would rather you felt it than believed me. Step your feet wide, turn the front foot out, and come into triangle without putting your hand anywhere, so the only thing holding you up is your own spine. Let the belly go soft and breathe into it, in and out. Notice how stable you feel. Come up.
Now go back into the same pose, and this time breathe into your top ribs. Feel that rib lift as you inhale. You should notice a gentle drawing in low in the abdomen that happens by itself. On the exhale you do not need to squeeze anything, just let it be there. Notice how much more stable that feels.
That difference is the muscle system you want working every time you side bend.
Press the outside heel down. The second protection is the glute on your back leg. Pressing the outer edge of that back heel firmly into the floor brings the glute in on that side without you having to think about contracting anything, and a working glute steadies the pelvis while you bend.
So if side postures give you lower back pain, those are the two things to change. Breathe laterally into the ribs, and drive that outside heel down.
The rule that covers all four
Look at what these four have in common. In every case the injury is not caused by the pose. It is caused by a compensation you make because your body cannot do the pose the way it is being asked, and the compensation is invisible from the outside, which is why it goes uncorrected for years.
Two things follow from that.
The first is the golden rule. You should not feel pain in a joint. If you finish a practice and your wrists, knees, ankles or lower back are complaining, something in how you are doing it needs to change. That is not a reason to stop practising. It is information, and it is specific enough to act on.
The second is that the answer is almost never to stretch harder. It is to find out what your own proportions and limits actually are, and then to build the practice around them. That is not a compromise. A practice fitted to your body is more powerful than a practice fitted to a photograph, and it is the only one you can still be doing in thirty years.
If your body is complaining, get eyes on it. Ask a teacher who understands anatomy, and if the pain is ongoing, see a therapist rather than waiting it out.
Can I find out more?
Everything above is anatomy that most teacher trainings touch briefly and then move past. On our 200 hour yoga teacher training in Canggu it is central, because I do not think you can responsibly put someone in front of a class without it. You will learn to spot these compensations in other people’s bodies as well as your own, which is why we keep the groups small enough that everyone gets seen individually and gets to look at a range of different bodies.
If any of this raised a question about your own practice, I am happy to talk it through. That is usually more useful than reading another article.
Anatomy is one half of teaching without doing harm, and the other half is how the room is run. I have written separately about what trauma informed actually means in a yoga training.
Several of these injuries begin with pushing into a stretch that the body was already resisting. If you want to know what that resistance actually is, I have also written about why muscles get tight, and why stretching does not make them longer.